Monday, October 29, 2012

Free Birthday sign!!


Who likes free stuff? Pretty much everyone, right?  Unless you’re a millionaire and have no problem spending money, just about everyone enjoys things that are free.

What’s something that’s free??? How about paint chips at your local hardware store! I love those things. I could spend hours looking through all the paint chips and designing rooms around each color.  Aside from being free inspiration, paint chips are now popping up everywhere to be decorations.

Like these found on Pinterest.  All these creative minds grabbed some free paint chips and a shape cutter and made beautiful banners, circles, and art.

Paint Chip Mobile 1
Via here

Via here
I enjoy free stuff too, so I needed to jump on that paint chip decorating band wagon.  When Mr. Pal’s birthday rolled around, I decided to make a Happy Birthday sign out of paint chips.

I went to my local hardware store and stood in front of all the beautiful colors. Would I go for blue and do an ultimate male sign; or pick colors that coordinated with our décor? I went with C, none of the above!! (haha, I tricked you!)  I decided to grab red, black and white paint chips.  Why pick these colors you ask?? The reason is that Mr. Pal is a HUGE New Jersey Devils fan.

Via here
So I grabbed my free paint chips and headed home.  I cut them all into long strips as you can see here.  Oh, and if you’re wondering which paint samples I grabbed they are for Bher paint.  I’ve been a Bher paint user for as long as I can remember, and I liked the size of their paint chips for my sign.


After cutting down all the strips, I then glued the cut pieces together to make each letter in “Happy Birthday.”    As you can see from this picture, I just used Krazy Glue to make my letters.  It was within reach at the time and I didn't feel like firing up my glue gun.    


After I had each letter made I grabbed some string that I had lying around and attached each letter to the string using paper clips.


Now, I’m sure I could have done something a little bit classier to attach each letter to the string. I could have added an extra piece of a paint strip to the back of each letter to attach it to the string that way, or thought of something else, but I didn't.  There’s no reason for it, just that I wanted to use what I had in the house.  Plus I wasn't sure how it was going to turn out, so I rushed a bit to get it done since I had only two days before Mr. Pal’s big day.

Here’s the “Happy birthday” sign all strung up in front of our dining room.


In keeping with use-what-you-got, I hung up the sign using Frog Tape.  It was durable enough to hold up my banner, but didn't rip off the paint on my living room walls.


I also made a hockey puck out of the paint strips.  Did I mention Mr. Pal loves the Devils? Cause he does!  For the puck I cut the black paint strips into thinner pieces like this.


 Then I glued them all together so I had a large piece-y square.


To make the puck I just grabbed the top of a candle that I had on our coffee table.


I traced out the shape.


Then cut it out so I had my "puck."


I added a white circle along with a free hand drawing of the Devils symbol to finish it off!


As for Mr. Pal’s opinion of his birthday sign on his big day?? Well, I had to point out the sign to him.  It was early in the morning and it was before his cup of coffee.  Plus he doesn't walk around looking up when he goes through the dining room to get to the kitchen! Haha!

When he did see the sign, he loved it! He especially loved the hockey puck since it had the Devils symbol on it. 


After all of Mr. Pal’s celebration, we said good-bye to our free Happy Birthday sign.  There are so many other possibilities to decorate for birthdays!  We did, however, hold onto the homemade puck.  Being a true Devils fan, Mr. Pal likes to keep anything that has the Devils symbol on it!

Friday, October 26, 2012

Smile!


Always look for the bright side!

That’s what I try to tell myself when I’m feeling down about our fertility treatments.  Sometimes it can feel very isolated when it seems like everyone around you has kids or is getting pregnant.  You tend to feel like you’re alone in your journey; that no one else gets what you’re going through.

Whenever I start to feel down about something, be it our infertility or my unemployment or anything at all, I have to make a joke out of what I’m going through.  It’s my defense mechanism.  I’m not a fan of being pitied so I try to make light of my situations.

For instance, every night I have to give myself injections in my stomach.  These injections will produce many, many, many eggs which can then be retrieved, fertilized and put back in, and hopefully grow into a little baby Pal. 

The downside of this is that I loathe needles. I wish I could close my eyes when I do the injections, but then I’d probably stab my fingers instead!  Also, I can’t keep injecting into the same area because it’ll become too sensitive and I’ll have a hard time getting the needle in.  Because of this I have to inject a different area around my belly button each night.

So what’s the upside?  Well, the needles cause some slight bruising, and since I have to change where I do the injections, the result is a smile shape around my belly button.

The bruises make me smile. I can’t help it, if I see someone else smile, I smile, so I guess if I see a smile shape made of bruises I smile too!  Granted it’s not a full smile, but it’s enough to make me happy that I have something not everyone else does.  Come on, how many people do you know with a smile around their belly button?

I know the picture is blurry, it's the best one I could take. The bruises are beginning to heal so they are more yellow-ish is this picture.
Also, as you can see from the picture I’m not exactly a size 2.  I often complain to my sister that I’m tired of the weight I've packed on from being home so much and from all the hormone injections.  I know, I know, it’s not healthy to have such a poor body image.

The upside of this weight gain is that I have my choice of belly rolls to grab when I need to do my injections!  The way I see it, if I was a size 2 then I wouldn't have any rolls to grab and then I’d probably hate the needles even more!  But, with my added weight, I can grab a roll with ease and inject away!! And I can smile knowing that I’m adding building to the smile on my belly!  

Wednesday, October 24, 2012

"It's a wall chandelier"


It had been a while since I did anything creative around the house.  I felt that after becoming addicted to Pinterest, most of the stuff I did around the house were knock-off’s of someone else’s creative idea.  It wasn't always that bad, but I felt like I was losing being original when it came to creative décor around the house. 

So I shut off Pinterest for a few days (I know, the horror, right? I’m so addicted to that website!) and decided to look around our house and decide what I felt we needed. 

I didn’t have to go far to look for a lonely wall!  Right in our living room on the right side of one of our windows as a big ol’ empty space!  It was screaming for something to make it look alive.  Now that I had the space, I just needed an idea.  That’s where Dollar Tree comes in.

Last month, they opened a new Dollar Tree right near our house.  The one that I usually shopped at was about half hour away and this one is only about 20 minutes away.  Plus, I don’t have to take an annoying jug handle to get to it.  Here in Jersey if you wanna go somewhere that’s on the opposite side of the road, you need to take a jug handle.  Sometimes I love them, like when I’m lost and need to turn around (which happens often).  But other times I feel like it’s a waste of gas since you need to pass your destination, turn around in the jug handle, then re-trace your steps the other way to get to  your destination.  I think this is why our gas prices are lower since we have to do a little bit more driving in jug handles to get to our destination.

Anyhooo, back to the new Dollar Tree, I checked it out a few days after it opened and found these lovelies.


They are packaged in groups of three and are called “snowflakes.”  I bought four packages of them because I thought they would be cool to make some kind of light fixture out of for the spare room...for whenever we get to turn it into a nursery…if it’s a nursery for a girl.  I figured if the nursery is for a boy then I’ll find another use for these “snowflakes.” 

While I was still allowing myself to troll Pinterest, I found this inspiration room. 

Via here

This picture made me think of doing something like this in our dining room. It doesn't have any regular windows and I figured it would make the room look a little bigger with these mirrors.  I wasn't totally sold on the idea yet, so I figured I’d let it bounce around in my brain for a bit.

While that picture was bouncing around my brain during my Pinterest dry spell, so was the reminder that I had those “snowflakes.”  I got to thinking that if I put the snowflakes in front of a mirror, they might look pretty cool.  Aaaaannnnndddd, it was an idea that came from my own brain! Not a knock off from! Which means, that I can allow myself to drool over Pinterest again!  That makes me Pinterest happy.

So I drove to my closer-to-me-by-10-minutes-Dollar-Tree to get more snowflakes and look for some mirrors.  I’m glad I went when I did since there were only two packages of those snowflakes left. They had others, but they were blue and I wasn’t digging the blue color.  I then went in search of a mirror.  I was hoping to find a big mirror like 8X10, you know, one that you would put candles on or something, but they had nothing like that.  I walked around the frame section and found these bad boys.

Since they were an odd size, I picked up three being sure how big I wanted this chandelier reflection wall piece. When I got home, I cut down some wood from those old shelves I have from this project (bathroom shelf).  In my head I figured two of the mirror stacked on top of each other was about the size I wanted.  I added a few inches to my wood so I could add something to the top to hang the snowflakes, which I’m now calling chandelier pieces, from.

I had some of this paint left over from other projects.  I’m in love with this paint. I love the color and the way it covers. It doesn’t hurt that it’s made by Martha Stewart! I adore her…well, except for the whole insider trading thing.  Just stick to crafting, Martha!!


I added the paint to the top and bottom of my wood and the sides then glued the mirrors onto it. 


 Since I had to take the mirrors out of the frames they were in, I figured I could cut them down so I’d have the longer pieces to attach to the top of my wood. 


I sawed them down so I had four long pieces from the mirror frames that I could work with.


 I then glued the four pieces together and painted them silver as well.


After the frame  pieces dried I added these eye hooks to the underside in order to have something to attach my chandelier pieces to.


After the eye hooks were attached I glued the frame pieces that were attached to each other to the piece of wood.  Then I just played around with the length of string for my chandelier pieces and tied them on.


Here’s the finished piece.  Mr. Pal said it looks like a chandelier for a wall.  I think that description fits, so I’ll stick with that.


It’s really hard to get a picture of something with a mirror without getting yourself in the shot.  I’m very thankful for 10-second timer! I was able to set it and duck down so my reflection wasn’t in the mirror.


It finally adds a little something to the blank wall.  Plus, it was all my idea, which makes me very happy.


I do feel that it’s a bit small for the wall and was thinking of adding something around it, but for now I just want to live with it and see if it grows on me.


I’m just happy to get back into doing creative stuff without the assistance of Pinterest.  Now if you excuse me, I need to see what’s new on Pinterest!! haha

Friday, October 12, 2012

Who wants more space?!

Who doesn't want more space, right? Whether it's in a garage, a closet or just in the house in general, more space is always welcome.

Space is definitely what we had in our full bathroom cabinet.  But it was empty space. As you can see from this post, I tried to keep it orderly, but to be honest it was an uphill battle. It was just too much stuff crammed into one shelf with a bunch of air about the mess.


Don't get me wrong, I tried to keep it clean, but when you toss extra toilet paper under there, or when we were in a rush, putting things back neatly in it's place wasn't happening.

I didn't really give it much thought and figured I could deal with the disaster until we had the money to gut that full bathroom. But that reno is very, very far off in the future.  So, one night I was scrolling through Pintrest and discovered some cool ideas.

image
Via here
Implement Every Inch
Via here
I love the shelves in the cabinet!!! I figured I could give this a try.  We have a bunch of spare wood in our garage from the previous owners, so I dragged a piece out, cut it down and added brackets.  And here we have a shelf in our cabinet!


I even added moulding to the back of the shelf to act as a lip so that nothing would fall off behind it.  You can kind of see here here if you look closely.


Now I have room to see all of my girly stuff instead of digging around knocking stuff over.  It's nice to just grab what I need instead of taking stuff out and searching for my nail file. And I am totally putting everything back in it's rightful spot now.  We don't have an excuse to get messy now that the shelf adds space to organize.


And now Mr. Pal can see all of his....ummm brush and hairspray.  I guess he doesn't need two shelves of crap like I do to get ready in the morning. Lucky him! haha 


Now we've done a renovation and I've done an instillation! It was such a great feeling to show off the new shelf to Mr. Pal when he got home.  I do have a funny story to share about this shelf.  The photo below is the cell phone pic that I sent to Mr. Pal with the caption, "Notice anything new?"


His first response was that I removed the doors.  Ummm, why would I remove doors from the bathroom cabinet? Even though it's organized, I don't want everyone seeing my stuff all the time.

His second guess was that I had organized it. I'm afraid he may need glasses soon.  I had to tell him that I added a shelf. That I went and used a saw and measured and cut the wood down and drilled it into the shelf. I then felt like I was fishing for a compliment. (which maybe I was?)  After he took a second look and noticed the shelf he liked it. He said I did a nice job.  :)

Wednesday, October 10, 2012

Just a little bathroom addition

When I finished painting the full bathroom, it was pretty much done.  I even had a spot for my perfume bottles. The only thing that was missing was a picture above the perfume bottles.


We had a picture there, but it no longer matched the new bathroom decor.  That meant it was time for me to make a picture! Yay time to be creative!

I knew I wanted a fleur de lis in the picture since the bathroom has a French theme, I wanted to stay with that theme. Plus it would match the great knobs we bought for the cabinet.


I sat and thought about what I wanted and finally was struck with inspiration!  I'll have the fleur de lis in a frame with a French poem.

Lucky for me (and Mr. Pal) this didn't require any drawing on my behalf.  An artist I am not, as you can see from this lovely picture I drew a while back.


Now I need to admit that in high school I took French.  I took it for three years actually.  And, I was fluent in it.  Then I stopped taking the class since I had passed the required three years by the State and took an extra study hall or something.  Anyway, long story short, I'm no longer fluent in French.  I do remember how to say, "hello", "how are you", "good bye" and "thank you."  I am ashamed that I forgot so much of a langue that I find so beautiful.  A few years ago I even rented some learn to speak french CD's from the library hoping to be fluent again.  It didn't work out too well.  The people on the CD spoke too fast for me! 
So, since I no longer spoke French, I needed to turn to the internet for a poem in French. I found one.  I wish I knew what it says.  

I typed up the poem on pretty scrapbooking paper, cut out a fleur de lis out of brown paper and glued it down onto maroon paper, which I then glued on top of my French poem.  I popped it in a frame, and here it is!


I think it looks really nice above my perfume bottles. Yes, I'm a little obsessed with my perfume bottles. I've always wanted them and now I own a few. I'm so happy!


I think the picture fits in nicely with the French themed bathroom. :)

Monday, October 8, 2012

Our first renovation!

When Mr. Pal & I first looked at our town home, one of the things I personally loved was the half bath on the first floor.  I liked that it was located where guests would most likely be hanging out and that it was just a half bath.  No extra tub to clean. (I kind of have a love-hate relationship with tubs. I hate cleaning them because of the effort, but love when it's all nice and clean.)


The looks of the half bath was really nothing to write home about.  It was screaming 1970's and the beige color made me nauseous.  I hate beige; it reminds me of apartments and offices. I need color in my life. I did like the shape of the floor tiles, but again, the beige was just not right.

As soon as we moved in we painted it blue, changed out the mirror and added art. (The previous mirror was a hideous medicine cabinet). It was livable for the time being, but we knew we wanted to do a complete overhaul.  The floor and the cabinets were just too ugly for the serene blue on the walls.


There are a lot of rooms that needed updated in our townhome, but being first time home buyers, and first time renovators, we were a little hesitant to get our feet soaking wet. We figured the half bath would probably be a good place to start since it was small. (unlike the kitchen, which is also stuck in the 70's.)
So I looked online for some inspiration and boy did I find some great ideas!

Bathroom Classic Blue Wall with White Wainscot
Via here

Via here

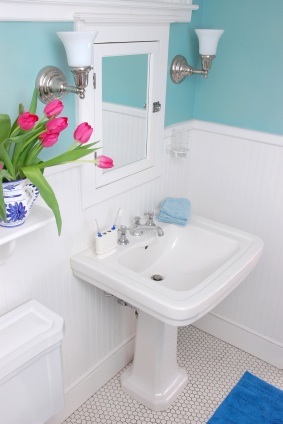
 Mr. Pal and I both agreed we wanted to keep the blue walls. We both loved the look of wainscoting and agreed that a pedestal sink would be perfect for the tiny half bath. It would free up the floor space unlike that hunk of a formica cabinet we had in there now.

We took a weekend and priced out toilets, sinks, tile and wainscoting at our local home stores to find the best prices. Once we found the best prices we went shopping! That's my favorite part!! We got a beautiful pedestal sink, a white toilet (hello new millennium!) and this tile that we both fell in love with.  The blue in the tile really tied into the blue walls, but if we get tired of blue walls, the tile is neutral enough to switch out the bathroom color.

Please excuse the horrible cell phone pic. I couldn't find the tile on-line.
We brought home our goodies and I called my dad for his help.  Growing up my dad had gutted and redid just about every room in the house I grew up in so I knew he'd be perfect to help us out with our half bath renovation.  I was so excited to start I could hardly sit still!

Once we knew when my dad would be coming to help us, we decided to get a head start and do the demo work ourselves.  Love demoing all the old, ugly stuff! Here's Mr. Pal getting rid of the beige toilet.


All gone!  There was still a little bit of water in the toilet that we couldn't get out which is why there are towels on the floor.  Also, we needed to make sure that we cover the hole in the floor due to gasses released.

Next it was time to kiss that formica cabinet and beige sink good bye!!


Our bathroom looks so much bigger without that formica cabinet taking up half the room. I just want to mention here that I didn't play a big part in this part of the demo.  Our toilet & sink came out pretty easily so Mr. Pal just plowed right through it.  I was a little upset I couldn't get my hands dirty/frustrations out, but we still had that beige floor to remove.


Here's our shell of a half bath.  I got to participate in the demoing of the floor.  It totally made my day!! The tiles came up pretty easily. I guess they knew they were ugly and needed to go! haha!  The glue was another story though. I think Mr. Pal & I scraped the glue for about three days.  When we had a free moment we would just go in there and scrape away.  We need the floor to be smooth for our new floor.


Now it was time to lay down the law tile. Here I am putting down the tile in our bathroom.  I was so excited that we had completed the floor with our own hands...with the help of my dad of course.  I'm sure if Mr. Pal & I attempted this on our own the tile would not be in a straight line. haha


And here is where I totally slacked off.  We moved so quickly with putting up the wainscoting and installing the sink and toilet that I totally forgot to take pictures along the way.  So, without further ado, here is the finished product.  Our very first renovation!


I'm in love with the wainscoting  the floor, the white appliances, I just love the whole room!   I'm just so happy with how our little bathroom came out.  See that toilet? That was one expensive toilet! We tried to keep our renovation under 500 bucks, but because the rough in for the toilet was 10" instead of the normal 12", we had to special order it, which cost more.  It also set us back a few days since we had to wait I think a week or so for it to be delivered to the store. I think when we move I'm going to measure all the toilets in the new place to make sure they have a normal rough in!


Here's our first "expensive" purchase from HomeGoods.  It was about $75, but it was the most we've ever spent in that store. I usually run in there to get small items, like hand towels or decor stuff, all of which never came to more than $20.  It was nice to finally use HomeGoods for what it's supposed to be for, which is discount furniture! I love this cabinet. It's the perfect size for this corner and holds our spare toilet paper and other bathroom necessities. 


And I can't show the bathroom without the best part.  And why is the light the best part?? Because it was F-R-E-E!!!  Yup, I totally love free and I'm not ashamed to take hand me downs.  This was from Mr. Pal's mom. She was completely gutting her own bathroom and was upgrading her lighting, so we got her old one. It fits perfectly in the room and the price always makes me smile!

So that's our first renovation.  I'm sure there's more to come. We learned so much and were so happy to have my dad lend us a hand and for Mr. Pal's mom to supply the lighting. On to the next reno!! :)